
In order to determine the best early Charge Blade in Monster Hunter Rise, we must first consider the position that the weapon finds itself in. When it made its debut in MH4U alongside the Insect Glaive, it was far too powerful, at least in the context of Monster Hunter weaponry, and you couldn’t go five minutes without finding yet another speedrun video featuring guard points. Such things were dulled down in the Generations titles, only for it to return to form in World, albeit surrounded by an arsenal that had caught up with it’s features. Thus we arrived at Rise with a healthy dose of suspicion; would it be a world beater, a shrinking violet or somewhere inbetween? There are plenty of complaints around Rise, most of which seem to surround the amount of content on offer, but we’re happy to report that the weapon balance is better than ever, and the Charge Blade manages to feel exactly like it should; powerful in the hands of an expert, cart magnet in the hands of a beginner. Unfortunately we can’t make you the former, actually we can’t even make ourselves the former, but we can surely help point the latter in the right direction.

Giga Grips
It’s taken 11 ‘early’ articles but we’re finally here: Recommending a Basarios weapon. Yes that’s right, we’re actually recommending that you take down one of the most annoying monsters in the series to craft our first choice, but the rewards are certainly worth it for the new player. Breaking through that rocky exterior is certainly a pain, and if you’re struggling we’d recommend grabbing either the LBG or HBG with some pierce ammo, but doing so is somewhat of a rite of passage for a hunter, and you’ll no doubt come up against it at some point so you might as well get it out of the way. It’s also worth noting that this is an Impact Phial Charge Blade, and whilst other types are certainly viable, this is still the de facto model that hunters prefer to use, thanks to their ability to inflict a KO.
Giga Grips then, is one of our very favourite early Charge Blade types thanks to it’s attached status: Poison. This means that repeated strikes to your target will eventually inflict the status, which deals a small tick of damage every few seconds. This may seem unusual, after all the weapon is all about charging up for those massive hits, but it’s worth remembering that new players aren’t going to know their targets too well, so having this trickle of damage over time will help them immensely during the learning period. On top of this, the Giga Grips has a good amount of raw damage, a nice chunk of green sharpness and it comes with a nice addition of 15 defence. It even comes with the Poison Boost I Rampage Skill to help build the status up even quicker.
Early Features
- Comes with the Poison status, which is a nice way to get additional damage done whilst new players learn monster patterns and openings etc. This can be amplified a little further with the Poison Boost I Rampage Skill.
- Good raw damage for the early portion of Low Rank.
- Reasonable chunk of green sharpness.
- Also has 15 defence attached to it, which is a nice bonus.
Crafting Requirements
- Basarios Shell x 3
- Basarios Pleura x 2
- Malachite Ore x 4
With any luck you may only have to take down the rocky chap once with crafting requirements such as these. Alright, so the desire sensor will probably find you and you’ll need to face it a few times, but regardless it’s a pretty easy craft. Both Shell and Pleura are fairly frequent drops & quest rewards, but if you’re struggling with the latter then breaking it’s chest will give you a slightly better chance. This is something you’ll want to do if you’re in melee anyway, and will probably happen by accident if you’re going with our recommendation of a pierce LBG or HBG!
Advertisement
Mizuniya Drill
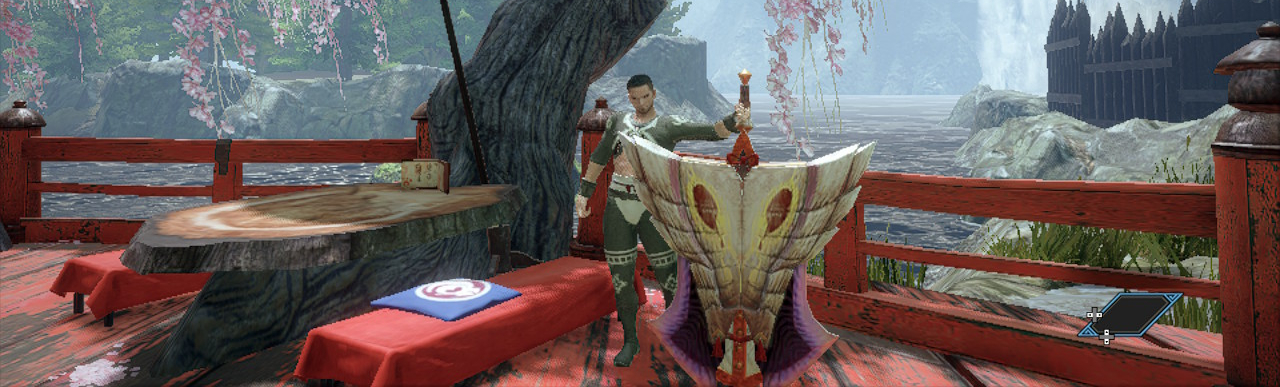
Outside of one or two particularly annoying quests in Generations, we do so love the Fated Four, and we’re sad to see them be underrepresented in Rise. In short, Generations and Ultimate had four key monsters known as the Fated Four, which comprised Glavenus, Astalos, Gammoth and Mizutsune. Whilst there were technically challenges greater than these in both games, they were considered the pinnacle of what you might call their ‘story’. As you might imagine, given that it’s named the Mizuniya Drill, the target for the next model in our list is Mizutsune, a name that we’re reliably informed is translated from the ancient Greek term for ‘one who flaps around with bubbles, all annoying like’.
To the model at hand then, and compared to our first choice the Mizuniya Drill is essentially a flat upgrade in almost every sense. Yes, the Poison has been replaced with a less-than-useful water element, but in every other regard it’s a better prospect. The raw damage is higher at 110, it’s green sharpness is longer and it’s Rampage Skills feature Attack Boost II. On top of this it even comes with 10% affinity, and whilst the Charge Blade is likely one of the weapons that cares least about affinity, it’s certainly nice to have. It’s also worth noting that this affinity scales up to 20% when fully upgraded, and it reaches the elusive blue sharpness too. You’ll no doubt move on from this as you approach the very end game, but on the way there it’ll hold its value very well.
Early Features
- Good raw damage, a slight upgrade over our first choice.
- Big section of green sharpness to keep you going for longer between whetstone uses.
- It’s another Impact Phial version, so you’ll still be able to KO fairly reliably.
- 10% affinity is a nice bonus.
- Features the Attack Boost II Rampage Skill.
Crafting Requirements
- Mizutsune Fin x 2
- Mizutsune Claw x 3
- Mizutsune Scale x 4
Well, we all knew that things were going to get a little harder here didn’t we. First up is the Fin, which can be awkward since it requires a head break to get a good chance, and whilst this is a great place to hit a Mizutsune, you might have trouble keeping up with it at first. As you might imagine, you’ll need to break the claws in order to get… Claws, which can also be quite annoying to achieve, though we do consider this a great deal easier than the head. Whilst you’re attempting to achieve either of these you’ll no doubt pick up plenty of Scales, so these should not be an issue at all.
Advertisement

Tigrex Divide
Oh sure, you’ve played around with styles that favor Affinity, Poison and sword mode in general, but what if you’re just looking to maximise those SAED (Super Amped Elemental Discharge)? Then look no further than the Tigrex Divide. Despite the Charge Blade being about so much more than this these days, it’s still nice to return to the style once in a while, and despite this particular model being well suited to it, that doesn’t mean that it cannot perform at everything else. Of course, this does mean that you’re going to have to take down a Tigrex quite a few times, but think of this as a right of passage – learning to take down the extra wide beast will equip you well for everything yet to come.
Much like the monster from which it originates, the Tigrex Divide is a model built in the mould of the old world; it’s an impact type, it has huge raw damage and the rest of the information doesn’t really matter. Thankfully it’s remaining stats aren’t that bad; it’s sharpness is excellent, even reaching a small amount of blue in the first model, and it has access to the Attack Boost II Rampage Skill. There is of course the issue of having -20% affinity, which can be an issue if you’re working with a sword heavy style, but this is why we’ve denoted it as a ‘retro’ Charge Blade – it’s all about those massive SAED slams, where affinity need not apply. You can of course patch this up with affinity boosting skills like Weakness Exploit and flat affinity on your equipment, and technically speaking models like the Nargacuga and Rajang will approach it in the late game, but for an all round model that’s very powerful in late Low Rank and throughout High, it’s hard to find anything better than the Tigrex Divide.
Early Features
- Massive raw damage & Impact Type Charge Blade.
- Huge amount of green sharpness with a small portion of blue at the base level. Will eventually access white sharpness when fully upgraded.
- Will upgrade very well into the late game, and continues to hold its value all the way to the end.
- Very much an ‘old’ style Charge Blade, designed for huge SAED (Super Amped Elemental Discharge) damage.
- -20% affinity is a concern for those playing a non-SAED style.
Crafting Requirements
- Tigrex Claw x 5
- Tigrex Scale x 2
- Tigrex Fang x 2
Well, they certainly wanted you to work for this one now didn’t they. We’d argue that the actual parts required here aren’t too hard to come by, but rather the amount can be a bit of a pain, especially those Claws. You’ll likely get plenty of Fangs if you’re going for the Tigrex head, which is rather easy to break and thus increase your chances, and the Scales are likely to drop or be carved quite consistently. The same is technically true of the Claws, however breaking the Tigrex’ front feet will improve your chances considerably. Don’t expect to get them all in less than three hunts, especially if the desire sensor is watching.

More Monster Hunter Rise…
Should Siege Hunts Return In Sunbreak? | Monster Hunter Rise
A long time staple of the series, siege hunts see one or more hunters take on mammoth opponents, often ludicrous in size and shape, whilst occupying massive, multi-tiered arenas. These have seemingly been usurped in Monster Hunter Rise, where they have instead opted for Rampages, and whilst these function in a somewhat similar fashion, they…
Our Sunbreak Monster Wishlist | Monster Hunter Rise
The sun will soon rise on the expansion for Monster Hunter Rise, Sunbreak. Having lived through far too many expansions and ultimate versions of games in this series, we’re all too aware of what these entail; greater challenges, new tiers of equipment and most importantly, more monsters. It’s this latter point in particular that interests…
Difficult Low Rank Monsters & How To Defeat Them | Monster Hunter Rise
Pushing your way through Low Rank can be tremendously difficult for those new to the Monster Hunter series. All of your friends are likely off fighting the latest version of a cataclysm approaching a small village, and yet here you are still struggling to get off the ground against base level opponents. Worse still, your…
Something went wrong. Please refresh the page and/or try again.
Categories: Monster Hunter Rise, Top 5